As a brand owner or buyer like Ron, you know that a baseball cap is a canvas for your brand. The logo embroidery and the construction stitching are not just functional elements; they are a direct reflection of your brand's commitment to quality. You've just received a production sample. It looks good from a distance, but you know the devil is in the details. You're worried that if you don't know exactly what to look for, you might approve a sample with subtle stitching flaws—flaws that will be magnified across a bulk order of thousands of pieces, resulting in a cheap-looking product and a tarnished brand image.
To properly check the stitching quality on a baseball cap, you must systematically inspect four critical areas using objective criteria: the density and clarity of the front logo embroidery, the consistency and straightness of the construction seams, the cleanliness of the interior taping, and the uniformity of the visor stitching. The goal is to look for consistency in stitch length, density, tension, and straightness, while actively searching for common defects like loose threads, puckering, or crooked lines.
I'm the owner of Shanghai Fumao Clothing, and we manufacture hundreds of thousands of caps every year. I can tell you that the difference between a premium cap and a cheap one is almost always decided by the quality of the stitching. It's the first thing a discerning customer will notice. A great cap feels solid and looks sharp because every stitch is in its right place. Let's break down the professional process for inspecting a baseball cap, so you can evaluate your next sample with the critical eye of a seasoned pro.
How Do You Evaluate the Front Logo Embroidery?
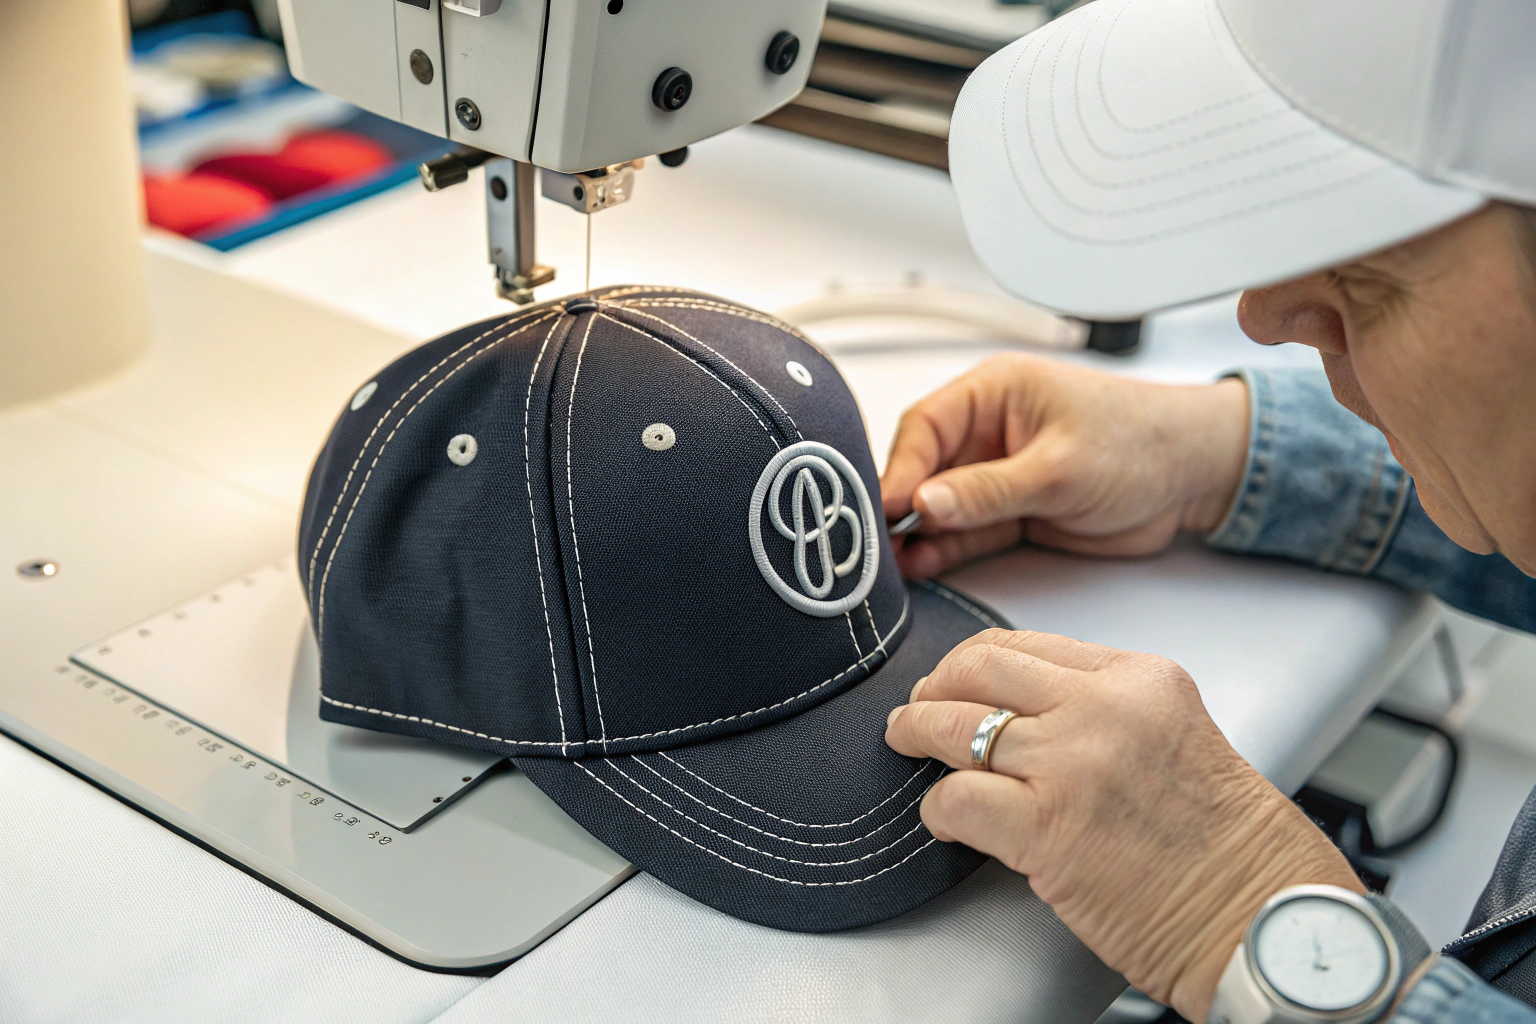
The embroidered logo on the front is the hero of the cap. It's the primary branding location and the area that receives the most visual scrutiny. If the logo looks cheap, the entire cap looks cheap. You need to know the specific technical signs of high-quality versus low-quality embroidery.
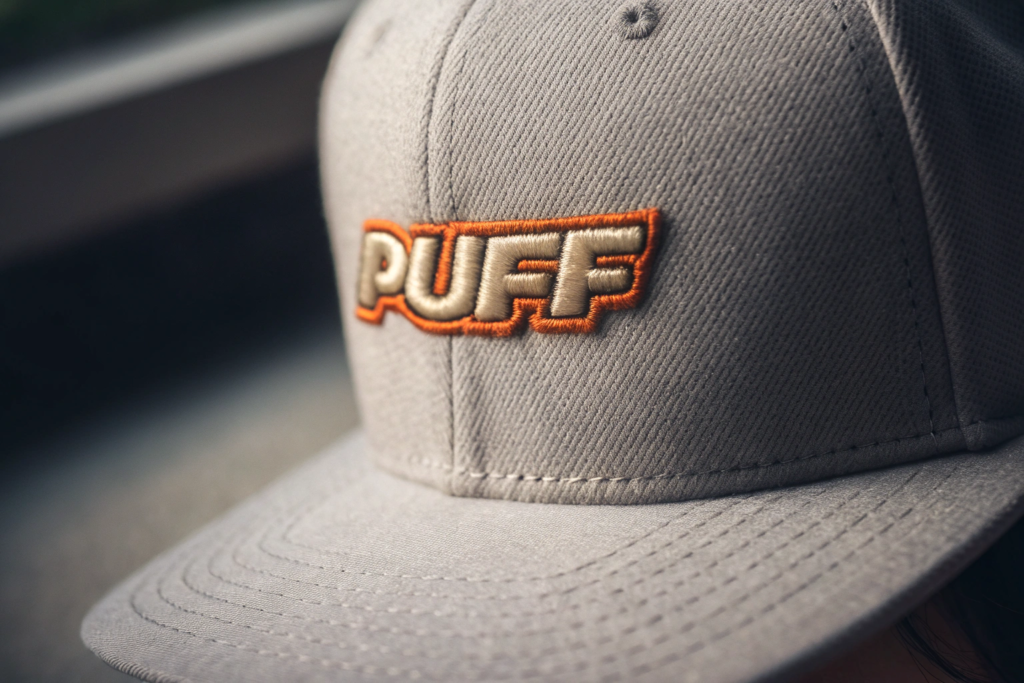
High-quality logo embroidery is defined by its high stitch density, clean edges, and lack of visible underlay or puckering. The stitches should be so tight that you cannot see the underlying cap fabric through the logo. For 3D or "puff" embroidery, the design should have a distinct, raised, and smoothly rounded surface with no foam visible at the edges.
Here is your professional checklist for the front logo:
- Stitch Density: Rub your thumb across the logo. Does it feel solid and smooth, or can you feel the texture of the fabric underneath? A premium logo will feel like a solid, dense patch.
- Edge Clarity: Look closely at the edges of the letters or design. Are they sharp and well-defined? Or are they fuzzy and uneven? Clean edges require a high stitch count and expert digitization of the design file.
- No Puckering: Look at the fabric of the cap immediately surrounding the logo. Is it lying flat and smooth? Or is it bunched up or puckered? Puckering is caused by the embroidery being too tight for the fabric, a common sign of amateur work.
- No Visible Underlay: A stabilizing material (underlay or backing) is used behind the embroidery. You should not see any of this material poking out from the edges of the logo on the front of the cap.
What is "digitization" and why is it important?
Digitization is the process of converting a digital art file (like a .jpeg or .ai file) into a stitch file (like a .dst file) that the embroidery machine can read. This is a highly skilled art form. An expert digitizer knows how to program the stitch type, direction, and density to create a beautiful, clean logo. Poor digitization is the root cause of most embroidery problems.
How do I check 3D "Puff" embroidery?
For 3D puff embroidery, which uses a foam underlay to create a raised effect, the key is to check the edges. The thread should completely cover the foam. If you can see the white or black foam peeking out from the sides of the letters, the stitch density is too low or the digitization was done incorrectly. The surface should also be smoothly rounded, not flat or lumpy.
How Do You Inspect the Construction Seams?
While the logo gets the most attention, the construction seams are what hold the cap together and give it its fundamental shape and structure. Flaws in these seams indicate a lack of care in the core assembly process, which can lead to issues with fit and long-term durability.
You must inspect the construction seams for three qualities: straightness, consistency, and tension. The stitches should run in perfectly straight lines, the length of each stitch should be uniform, and the tension should be balanced—not so loose that you can see loops, and not so tight that it causes the fabric to pucker or bunch.
Turn the cap over in your hands and examine it like a piece of machinery.
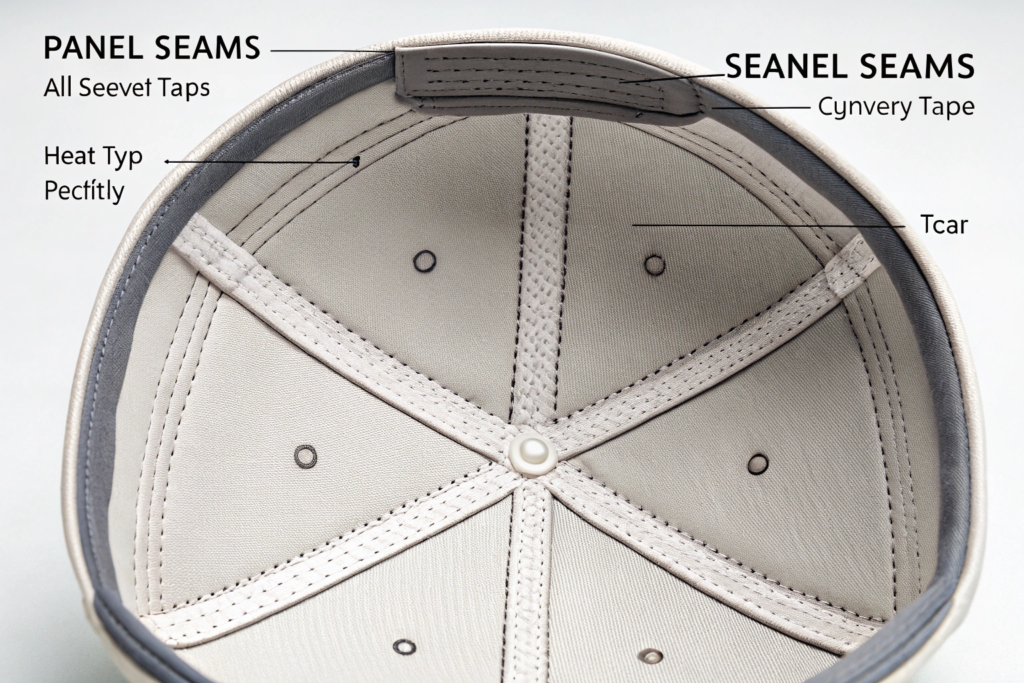
- Panel Seams: Look at the seams that join the six panels of the cap. Are the stitch lines straight from the base to the top?
- Symmetry: Look at the cap from the front. Is the center seam on the front two panels perfectly aligned in the middle? Symmetry is a hallmark of careful assembly.
- Stitch Consistency: Look closely at a single seam. Are all the stitches the same length? Or are some long and some short? Consistency is a sign of a well-calibrated sewing machine and a skilled operator.
What is the most critical seam to check?
The point at the very top of the cap where all six panel seams converge is a key inspection point. In a high-quality cap, these seams will meet at a near-perfect single point. In a lower-quality cap, they will be messy, misaligned, and off-center. This is a quick and easy way to judge the factory's precision.
What about the thread color?
Unless it's a deliberate "contrast stitch" design, the thread used for the construction seams should be a perfect color match to the fabric. A poor color match is a sign of carelessness and can make the cap look cheap.
How Do You Judge the Interior Taping and Sweatband?
The inside of the cap is where many brands try to cut corners, thinking the customer won't notice. But a discerning customer—and a professional buyer—will always look inside. The quality of the interior finishing reveals the factory's true standards.
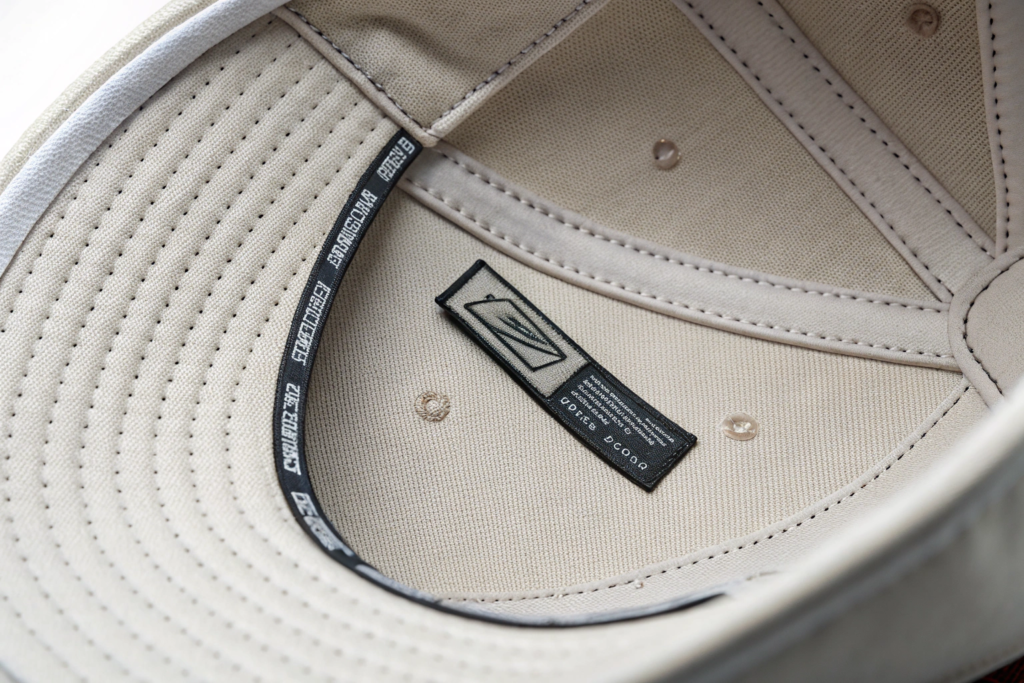
A high-quality interior is defined by its clean and securely applied seam taping and a neatly attached sweatband. The fabric tape covering the interior seams should be stitched down evenly on both sides with straight, consistent stitching. The sweatband should be attached with a clean, straight line of stitches, and any interior labels should be centered and sewn on securely.
Flip the cap inside out and check these two areas:
- Seam Taping: Look at the fabric tape that covers the raw edges of the panel seams. Is it centered over the seam? Is it stitched down neatly on both edges? In a cheap cap, this tape will often be crooked, or the stitching will be wavy and uneven.
- Sweatband Attachment: This is a crucial area for comfort and durability. The stitching that attaches the sweatband to the cap should be a single, continuous, and straight line. Look for any skipped stitches or areas where the stitching wavers. Also, check that the join of the sweatband at the back is clean and secure.
A clean interior is a sign of a factory that doesn't cut corners, a principle well-understood in quality management systems like ISO 9001.
What kind of interior labels should I look for?
Inside the sweatband, you will typically find the main brand label and the care/content label. These should be woven labels, not cheap printed ones. Check that they are centered, straight, and securely stitched. A crooked or poorly attached label makes the entire product feel cheap.
What about the button on top?
The fabric-covered button on top (called a squatchee) should be centered perfectly where the panels meet. It should feel tight and secure. If it's loose or off-center, it's another sign of sloppy assembly.
How Do You Inspect the Stitching on the Visor?
The rows of stitching on the visor (or brim) serve both a functional purpose (giving the visor its structure and rigidity) and an aesthetic one. These parallel lines are a classic design element of a baseball cap, and any inconsistency is immediately obvious.
The stitching on the visor must be perfectly uniform and concentric. Each row of stitching should be parallel to the one next to it, maintaining an exact, even spacing from the edge of the visor to the base. The stitch length should be consistent across all rows, with no visible flaws or loose threads.
This is a test of the sewing operator's skill and the factory's machinery.
- Parallelism and Spacing: Look at the visor head-on. Are the rows of stitching perfectly parallel, like lanes on a running track? Or do they get closer and farther apart? Even spacing is key.
- Concentric Shape: The rows should follow the curve of the visor's edge perfectly.
- No "Run-Off": Check where the stitching starts and stops near the sweatband. It should be clean and back-tacked securely, not messy or running off the edge.

How many rows of stitching are standard?
The number of rows is a design choice, but it typically ranges from four to eight. A standard baseball cap often has six or eight rows. The important thing is not the number of rows, but the quality and consistency of their execution.
What should I check on the edge of the visor?
The final stitch on the very edge of the visor is critical. It should be clean, tight, and consistent. This stitch is what seals the top and bottom fabrics together and is subject to a lot of wear. Any looseness or inconsistency here is a major quality flaw.
Conclusion
Inspecting the stitching on a baseball cap is a skill that separates a professional buyer from an amateur. By moving beyond a quick glance and adopting a systematic, four-point inspection process—evaluating the logo, the construction seams, the interior, and the visor—you can accurately judge a factory's true level of skill and attention to detail. This meticulous approach empowers you to reject flawed samples, demand higher quality, and ultimately protect your brand by ensuring that every cap you sell is a testament to quality craftsmanship. A brand is built one stitch at a time, and ensuring each one is perfect is the foundation of lasting success.
At Shanghai Fumao Clothing, we are obsessed with the details. Our multi-stage quality control process checks every one of these points and more, ensuring that every cap that leaves our factory meets the highest standards of quality. If you are looking for a manufacturing partner who shares your commitment to stitching perfection, please reach out to our Business Director, Elaine, at elaine@fumaoclothing.com.