
Are you a new brand owner with a brilliant idea for a fashion accessory? Do you have a vision for the perfect hat, scarf, or belt, but the thought of actually getting it made seems overwhelmingly complex? You hear terms like "tech pack," "MOQ," and "FOB pricing," and it feels like learning a new language. It's a common feeling, and it stops too many great ideas from ever seeing the light of day.
So, how can you simplify this process? The key is to break it down into a series of clear, manageable steps, focus on one product to start, and find a manufacturing partner who is willing to guide you through each stage. As the owner of Shanghai Fumao Clothing, I believe our job isn't just to make products; it's to make the process understandable and accessible. A good manufacturer should be a partner and a teacher, especially for a beginner.
Does the journey from a sketch on a napkin to a box of finished products have to be so complicated? No. Let's simplify it together. Here is a four-step guide to get you started.
How Do You Clarify Your Idea and Start with Just One Product?
What's the biggest mistake beginners make? They try to do too much, too soon. They want to launch with ten different styles of hats, five styles of scarves, and three styles of belts all at once. This is a recipe for confusion, budget overruns, and overwhelming stress.
How can you simplify this? Start with one. Choose your single best, most focused product idea and decide to make that one product perfectly. This "hero product" approach allows you to focus all your energy, budget, and learning on a single, manageable project. You'll learn the entire process from start to finish on a small scale, which will give you the confidence and experience to expand later.
Isn't it better to launch one amazing product than a dozen mediocre ones? This focus will be your superpower.
How Do You Choose Your "Hero Product"?
Which idea should you pick? Choose the product that you are most passionate about and that you believe solves a clear problem or serves a specific niche audience. It should be a product you understand deeply. For example, if you're an avid runner, starting with a performance sports cap makes more sense than starting with a formal silk tie. Your personal experience will make the design and decision-making process much more intuitive.
What Key Details Should You Define?
Once you've chosen your product, what information do you need to gather? Before you even contact a factory, try to define these key details for your single product:
- Material: What will it be made of? (e.g., 100% cotton, genuine leather, polyester)
- Dimensions: What are the approximate measurements? (e.g., for a scarf, 180cm x 70cm)
- Color(s): What specific colors do you want? (e.g., black, navy blue, and cream)
- Key Features: What makes it special? (e.g., custom logo embroidery, a unique buckle, a waterproof finish)
Having these basic details clarified will make your first conversation with a supplier much more productive.
What is a "Simple Tech Pack" and Why Do You Need One?
You have your idea. How do you communicate it clearly to a factory so they can make it exactly as you envision? You need a tech pack. Don't let the name intimidate you.
What is a tech pack at its core? It's simply a set of instructions. For a beginner, it doesn't need to be a 50-page technical document. A simple, clear tech pack can be just a few pages. It should include sketches or photos of your product, the key measurements, the materials you want to use, and the colors. It's your product's blueprint.
Why is this so important? A clear tech pack eliminates guesswork. It ensures that you and your supplier are on the exact same page, which is the best way to avoid misunderstandings and costly sampling errors. It's the most professional way to present your idea.
What Are the Essential Parts of a Beginner's Tech Pack?
What must you include?
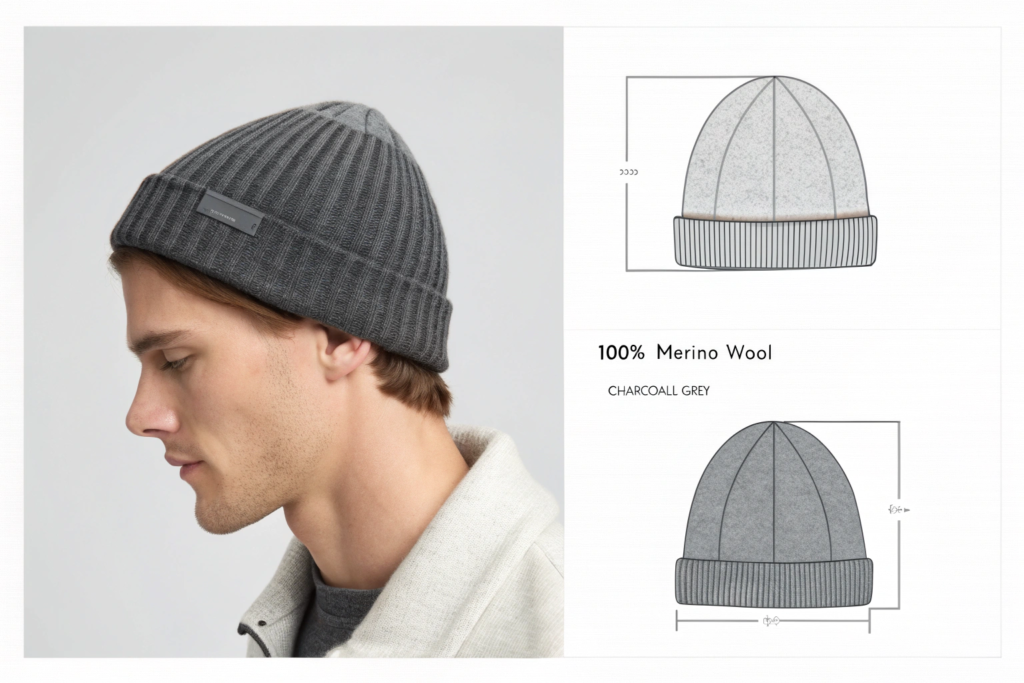
- A Cover Sheet: This should have a clear drawing or image of your product and your brand name/contact info.
- A Spec Sheet: This is the most important page. It includes a "flat sketch" (a simple, 2D drawing) of your product with all the critical measurements clearly labeled.
- A Bill of Materials (BOM): This is just a list of all the materials needed. For a hat, it might be: "Main Fabric: 100% Cotton Twill," "Closure: Metal Buckle," "Thread: Matching Color."
- Colorway Info: Show the exact colors you want. The best way to do this is by using a universal color system like Pantone. Providing a Pantone code (e.g., "Pantone 19-4052 Classic Blue") ensures we get the color exactly right.
Can You Use Photos Instead of Sketches?
What if you can't draw? Yes! For your first project, it's perfectly acceptable to use photos. Find pictures of existing products that have the shape, features, or details you want. You can then annotate these photos with arrows and notes to explain your specific vision (e.g., "Use the shape of this hat, but with the buckle from this other hat, in this specific color"). This is a great way to create a visual guide for your manufacturer.
How Do You Find the Right Partner and Get Your First Sample?
With your focused idea and simple tech pack in hand, you are now ready to contact potential suppliers. How do you find the right one? For a beginner, the "right" partner isn't necessarily the cheapest one. It's the one who is willing to communicate clearly, guide you through the process, and handle a smaller order quantity.
Your goal at this stage is to get your first pre-production sample. This is a physical prototype of your product that you can hold, feel, and test. This sample is everything. It's your chance to see your idea come to life and make any necessary corrections before you commit to a full production run.
How do you navigate this crucial step? The key is clear communication and finding a supplier who values partnership.
Where Should You Look for a Beginner-Friendly Supplier?
Where can you find these partners? While massive B2B platforms can be overwhelming, they often have filters to find suppliers with lower MOQs (Minimum Order Quantities). Look for suppliers whose websites and profiles show they have good English communication skills and seem open to working with emerging brands. Don't be afraid to state in your first email: "I am a new brand owner, and this is my first production run." A good partner will appreciate your honesty and will be more supportive.
What is the Sampling Process in Simple Terms?
What are the steps to get your sample?
- Send Your Tech Pack: Email your simple tech pack to 2-3 potential suppliers.
- Get a Quote: They will send you a price for the sample and an estimated price for bulk production.
- Pay for the Sample: Sample fees are standard. This covers the cost of the materials and the specialized labor to create a single piece.
- Wait for the Sample: This is where fast sample development becomes a huge advantage.
- Review and Approve: Once the sample arrives, review it carefully. If it's perfect, you approve it. If it needs changes, you provide clear feedback for a revised sample.
What Do You Need to Know Before Starting Your First Production Run?
You've approved your "golden sample." You're thrilled. Now you're ready for the final step: placing your first bulk production order. This is the moment you go from designer to business owner.
What do you need to know before you press "go"? Before you send a large amount of money, you need to be crystal clear on three things: the final price, the production timeline, and the payment terms. Getting these details confirmed in writing is essential for a smooth, stress-free production run.
![]()
How Do You Confirm the Final Price and Timeline?
Based on your approved sample, the factory will give you a final bulk production price per unit. They will also give you a production lead time (e.g., 30-45 days), which is the time it will take to produce your order after you have paid the deposit. Make sure you get this in writing in a formal Proforma Invoice (PI) or Purchase Order (PO).
What Are Standard Payment Terms?
How is payment typically handled? It is very rare for a factory to produce an order without a deposit. The most common term for a new client is a 30% to 50% deposit before production begins, and the remaining 70% to 50% balance payment once production is complete and before the goods are shipped. This is a standard practice that protects both you and the factory. Be wary of any supplier demanding 100% upfront for a bulk order.
Conclusion
So, how can you simplify the fashion accessory production process? Does it still seem like an impossible mountain to climb? Hopefully not. By breaking it down, you can see it's a logical sequence of steps.
The key is to start small and focused with one hero product. Create a simple, clear tech pack to communicate your vision. Find a supportive partner to guide you through the crucial sampling stage. And finally, ensure all the key terms are clear before you commit to your first production run.
The journey of a thousand miles begins with a single step. Taking that first, simplified step is the most important thing you can do. We love working with new brands and helping them bring their first product to life. If you're ready to take that step, we're here to walk the path with you. Please contact our Business Director, Elaine, at her email: elaine@fumaoclothing.com.